How to take a screenshot on iPhone or iOS/iPadOS in 2026?
Here’s how to take a screenshot in iOS 26 on any iPhone or iPad model. There are multiple screenshot methods used on iOS devices. The fastest iOS screenshot method is pressing the side button and the Volume Up button. The iPhone screenshot key is pressing the side button and Home button together.

Methods to take a screenshot in iPhone/iOS
Each iPhone model has its own screenshot method. The fastest and easiest screenshot method is using the device’s physical buttons.
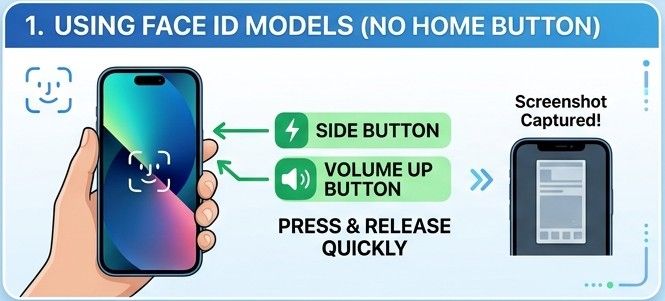
Using Face ID
- Simultaneously press the side button and volume up button
- Release both buttons quickly
- The SS iOS will automatically save to your device's gallery
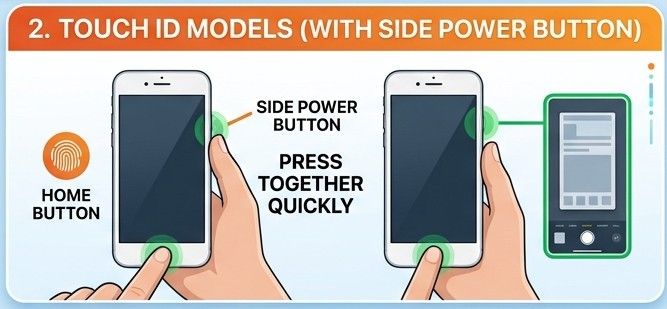
Touch ID or Side Button
- Press the Home Button and the side button together
- Release both buttons quickly
- The image will save to the gallery instantly
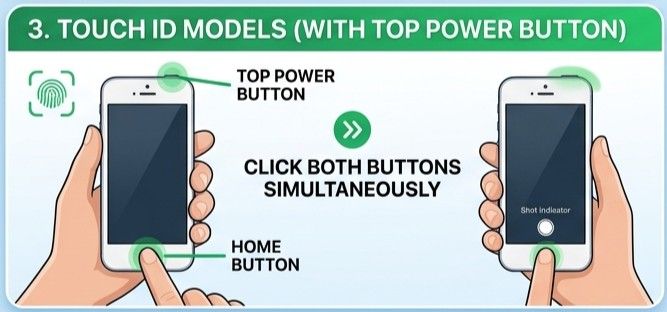
Touch ID and Top Button
- Click the home button and the top volume button at the same time
- Now, quickly release the buttons, and the screenshot will be saved to your iPhone
Using Face ID
If buttons are not working, try a different method without using buttons. Here are some alternative methods for Screenshot iOS:
iOS Screenshot Alternatives
You can easily take screenshots on laptops. The process is the same, but sometimes you may need to press an extra key. If the print screen button doesn’t work, press the Fn+PrtScn key to activate it. This adjustment is common on laptops from brands such as Lenovo, HP, Asus, and Dell. Aside from this small difference, laptop users can follow the same screenshot shortcuts as PC users without any issue.
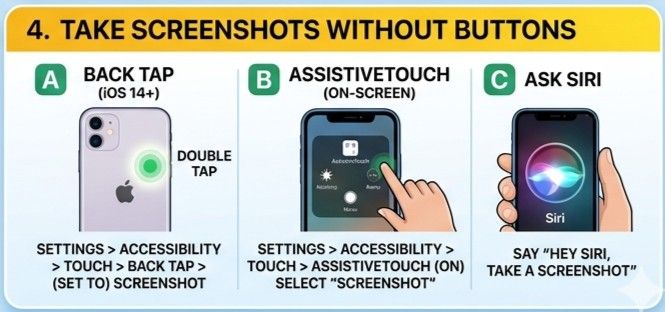
1. Use Siri
Just open Siri and say, “Hey Siri, take a screenshot.” It will capture your screen instantly. Open the gallery and locate your image in the screenshot folder.
2. Use Back Tap
Open the Settings app on your iPhone and turn on the Back Tap option. Then, on your iPhone, tap 2 or 3 times to take a screenshot without touching the side buttons.
To enable the Back Tap option, follow the settings:
- Go to the settings
- Click the Accessibility option, which will open the Touch options
- From the Touch section, click the Back Tap option
- Select Double Tap or Triple tap
- Now assign Screenshot as the action
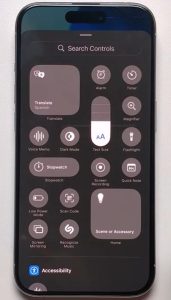
3. Use Assistive Touch
Use the Assistive Touch method without using physical buttons. It places a floating button on your screen, giving you quick access to different actions, including taking a screenshot. With just a single click, you can capture your screen anytime without pressing physical buttons.
4. Use iOS app screenshots
Several third-party iOS screenshot apps can help you capture your screen more flexibly. Some popular options include
- Stitchshort
- Screenshot Pro
- Xnapper
- Shareshot
- Stitch It
How to take a scrolling screenshot on an iPhone?
You can take a scrolling or full-page screenshot immediately by tapping the thumbnail and choosing “Full Page” at the top. Similar full-page capture methods are also available on Mac and Windows for supported apps and browsers. It works on Safari, Notes, and Files.
- Capture the iPhone screen using your preferred method, Face ID, or Touch ID.
- In the bottom left corner, click the small thumbnail option before it disappears
- Tap 'Full Page' to take a full-page screenshot on your iPhone
- From the editing options, you can also crop or save the image if needed
- Click the save button to save the image
- If you want to save the image in PDF, click “Save PDF to Files” to save the full document.
Screenshot iPad Method
To capture your iPad screen, the method varies by model. You can capture the iPad screen using your method. Whether you have an iPad Pro, iPad mini, iPad Air, or a standard iPad, the steps below apply to all models.
Capture the iPad screen by pressing the top power button and home button at the same time. After that, quickly stop pressing the button. It will capture your screen instantly, and the image will be saved to your iPad device’s gallery.
2. Without Home Button
Clicking the top power button and top-volume button together. After a second, release both buttons. Open the gallery and locate your SS in the screenshot folder.
3. With the screenshot iPad Pencil
Taking a screenshot on iPads using Apple Pencil is quick and smooth.
- Swipe diagonally upward from either the bottom-left or the bottom-right corner of the screen
- After swiping, your screen is captured instantly and opens in the editing view
- In editing, you can edit, crop, or share it with others
4. Screenshot with Gesture or Assistive Touch
Back Tap is an iOS screenshot gesture that lets you capture your screen with a double or triple tap on the back of your iPhone — no buttons needed.
- Open the settings section of your iPad and enable the option “Multitasking & Gestures.”
- Now, open the screen you want to capture
- Swipe with your finger inward from the bottom-left corner of the screen to capture the screen
- Automatically, your screenshot will be saved in the gallery
- First, turn on Assistive Touch from settings
- Open settings and click on Accessibility. Press the “Touch” option and enable the Assistive Touch button
- After that, click on the floating menu
- Choose Device, click More, then click Screenshot.
- Now, open the screen you want to capture
- It will capture your iPad screen instantly
You can take screenshots on the iPad Air, iPad (standard), and iPad Pro using the methods above.
How to take a screenshot on iPhone 8, 12, 13, 14, 15, 16 Pro, and 17?
The correct screenshot method depends on whether your iPhone model uses Face ID or has a physical Home Button.
Screenshot iPhone 8
iPhone 8 uses the Home button and Sleep/Wake button method to capture the screen.
iPhone 12, 13,14, 15, 16 Pro and 17
These iPhone versions follow the Face ID screenshot method. You can also use alternative methods, such as Siri, Back Tap, the iOS Screenshot App, iOS app screenshot generator, and more.
Where do I find my screenshots in iOS?
iOS Screenshots are automatically saved to your device’s gallery, unlike Windows and Linux, where screenshots are typically saved in dedicated folders by default. You can access the screenshot by following the steps:
- Open the Photo App
- Click on the Album option at the bottom of the screen
- Click the Recent option
- Your most recent screenshots will be at the bottom
iOS screenshot sizes vary by device — for example, iPhone 16 Pro captures at 1320×2868 px
Screen Recording in iPhone or iPhone screenshot video capture
Screen recording on iPhone captures everything on your display as a video ideal for tutorials, gameplay, or saving live streams. Screen recording on iPhones is easy, but it requires some settings. You can configure this by following the steps below :
Setting Up the button for the iPhone or iOS Screen Recording
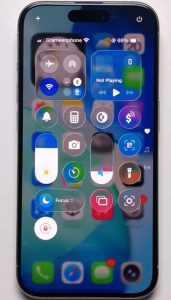
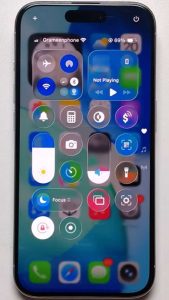
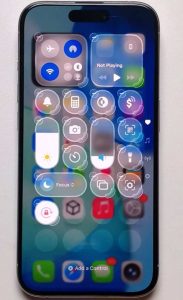
If the record icon isn’t set up in your control center, you can add it in a few simple steps:
- From the top-right corner, swipe down to open the control center
- Now, press and hold a space until a menu appears
- Click the option “Add a Control” at the bottom
- Search for the Screen Recording option
- Click it to add the shortcut

How to Screen Record with Audio in iOS?
In the control center, long-press the screen recording icon to capture external sounds or disable sound entirely. Tap the Microphone option to include or exclude your voice from the recording. Before starting the recording, tap On or Off.
How to edit, crop, send, save, or cancel the screenshot?
After taking the iPhone screen, a small preview will show in the bottom-left corner of your screen. Click the preview screenshot to open it for editing.
Edit the Screenshot
Use the markup tools to draw, add text, highlight, or make notes directly on the image.
How to crop a screenshot on an iPhone
After taking a screenshot on iPhones, you can crop it immediately using the built-in editor. Drag the corners or edges of the captured image to remove unwanted parts and save only what you need.
Send or Share the Screenshot
Tap the share icon (the curved arrow icon) to send your screenshot using messages, social apps, email, or other sharing options.
Save Screenshot iPhone
Click the Done button. Choose the option Save to Photos to keep it in your gallery. You can also choose Save to Files for storage in a folder.
Cancel or Delete
If the screenshot is no longer needed, click the Done button, and then click the Delete Screenshot to remove it.
iOS screenshot Bug or Troubleshooting for screenshots on iOS
If screenshots are not working properly on your iPhone or iPad, these quick fixes can solve most common issues:
iPhone Black Screenshot
Issue:
Screenshot iPhone is blocked. The black screenshot iPhone appears just after taking a screenshot.
Solutions
When we try to capture protected content, we get a black screen, for example, a streaming app or a banking app. It prevents screen capture for privacy or copyright reasons. Try iOS Screenshot Apps or use another device to capture the screen if necessary.
Screenshot iPad not working
Problem
The Screenshot is not working on iPhone or iPad.
Solutions
- Restart your device and check whether the buttons are working properly
- Enable the Assistive Touch if the issue persists
- Use on-screen screenshot options instead
iPhone screenshot quality bad
Issue:
The captured images are blurry or low-quality after sending them.
Solutions
You can maintain image quality by saving the screenshot in Photos. Or share the original image for better quality, as compression reduces quality when sharing via messaging apps.
New iOS screenshot is annoying
Problem
Many users find the new iOS screenshot thumbnail preview annoying.
Solutions
Swipe the thumbnail preview left quickly after taking a screenshot. It will be automatically saved to the gallery.
No Flash or Screenshot Appears on iPhone
Issue:
No white flash or thumbnail appears after pressing the buttons.
Solutions
- Click and hold the Sleep/Wake button
- Now, quickly release the Home Button
- If it is done correctly, the screen will flash white
- The screenshot will be saved to Photos
- If it is still not working, restart your iPhone
- If the issue persists, use Assistive Touch as an alternative
FAQs
Is there a faster way to screenshot on iPhones?
Yes, there are some faster methods used for taking screenshots on an iPhone. You can use Siri, Back Tap, or Assistive Touch for a quick screenshot without pressing physical buttons.
What is the screenshot iPad keyboard?
You can capture your iPad screen using its attached keyboard. Press together the screenshot iPad keyboard shortcut—Command+Shift+3. After using this shortcut key, the image will instantly be saved to your device’s gallery.
How do I change screenshot settings on an iPhone?
You can configure screenshot shortcuts directly in iPhone Settings — go to Settings, then Accessibility, and enable the Touch option. On your iPhone, go to Accessibility and enable the Touch option. You can also set up the Assistive Touch or Back Tap from Settings to capture screenshots.
What is an iPhone scrolling screenshot?
An iOS scrolling screenshot captures the full page, documents, or a long screenshot instead of only what is visible. In the supported iOS Screenshot App on your iPhone, press the preview option, choose the entire page to save the image as a file.
What is the shortcut for screenshot on an iPhone?
The fastest, shortcut screenshot method is to press the power button and the volume up button together. After 2-3 seconds, release both buttons. Preview the screenshot, edit, share, or save it.
How to use the iPhone screenshot key or shortcut key?
The iOS shortcut is to press the side button and volume button simultaneously for a quick screen capture. Release both buttons after 2 to 3 seconds.
How to change iPhone screenshot quality settings?
iPhone doesn’t have screenshot quality settings. The captured images are automatically saved to your device’s gallery in high quality, but you can share them using messaging apps. These apps may compress images, reducing clarity.
What is the screenshot of the iPad Magic keyboard?
You can take a screenshot on an iPad using the Magic keyboard. Press Command+Shift+3 at the same time. While connected to your iPad, this shortcut will capture your screen instantly and save it to Photos for editing or sharing.
Which one is the Sleep or Wake button?
This is a single button on the side of the device, also known as the Power button, used to lock or wake your phone. Usually, it is on the right, while on an iPad, it is at the top or side, depending on the model.