How to Screenshot on Windows
(11/10): Shortcut Keys for PCs and Laptops
Instant Capture
Built in & Advanced
PCs & Laptops
Windows offers multiple methods for taking a screenshot on Windows using shortcut keys, the built-in Snipping Tool, third-party tools, or simple keyboard combinations. The fastest way to capture your screen in Windows is to press Windows + Shift + S, which opens the Snipping Tool overlay. It allows you to select a rectangular snip, freeform snip, a specific window, or the full-screen capture and copies the result to your clipboard. Press Windows + Print Screen to auto-save a full-screen screenshot directly to your Pictures > Screenshots folder without any extra steps.
On Windows 11, the Snipping Tool has replaced the older Snip & Sketch app and now includes screen recording, OCR text extraction, a delay timer, and a built-in editor for annotation. You can also use third-party screen capture tools like ShareX, Greenshot, or Snagit for advanced features like scrolling screenshots or automated uploads.
What are the Screenshot Windows Shortcut Keys or Methods?
There are multiple ways to take a screenshot on Windows, and the fastest are the built-in keyboard shortcuts. Each method works differently some copy to your clipboard, others auto-save a file directly to your Pictures > Screenshots folder. Knowing the difference saves you time. These screenshot shortcuts work instantly without opening any app.
print screen on Windows to capture Full Screen
Full Screen Capture
This is the most basic screenshot method on PC and works on almost all computers. To capture the entire screen, press Print Screen (PrtScn) on your keyboard. It copies the image to the clipboard and pastes it into Paint, Word, or any other app.
Important: PrtScn copies the image to your clipboard only it does not save a file. You must open Paint (or any image editor) and press Ctrl + V to paste, then save it manually.
On Windows 11 (version 23H2 and later), pressing PrtScn alone may now open the Snipping Tool overlay instead of copying to clipboard.
You can control this behavior under Settings > Accessibility > Keyboard toggle “Use the Print Screen key to open screen capture” on or off.
On laptops where PrtScn doesn’t respond, try Fn + PrtScn instead.
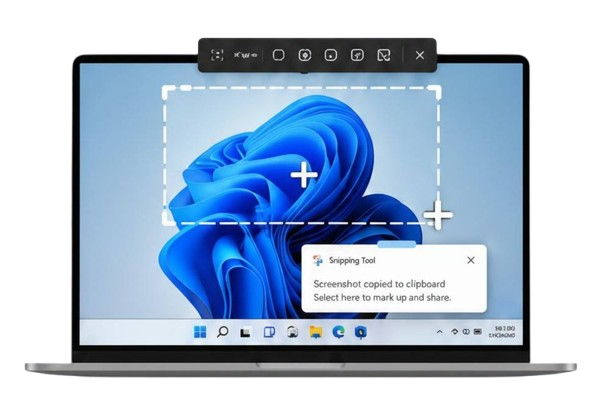
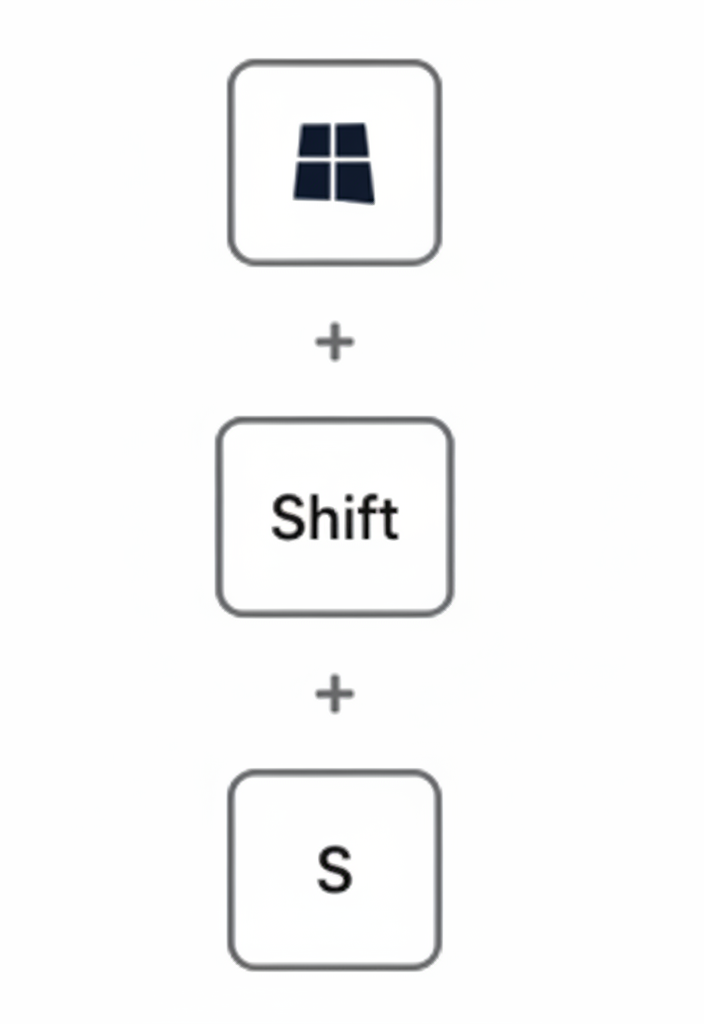
Windows + Shift + S Capture a Part of the Screen
Snipping Tool Shortcut
This is the most popular Windows screenshot shortcut for everyday use. Press Win + Shift + S to instantly open the Snipping Tool overlay your screen dims and a small toolbar appears at the top center. You can choose from four snip modes:
- Rectangular snip : drag a box around any area (most common)
- Freeform snip : draw any custom shape with your mouse
- Window snip : click any open window to capture it cleanly
- Fullscreen snip : captures the entire screen instantly
The screenshot is copied to your clipboard it is not saved as a file automatically. Click the notification that appears in the bottom-right corner to open the Snipping Tool editor, where you can annotate, crop, and save it.
Alt + Print Screen
Active Window Only
Pressing Alt + PrtScn captures only the active window the app or dialog box currently in focus and ignores everything else on screen including the taskbar and background windows. This keeps screenshots focused and professional. It is the fastest way to screenshot a single app, browser tab, or dialog box without cropping afterward.
Like PrtScn, this copies to your clipboard only no file is saved automatically.
- Paste with Ctrl + V into Paint, Word, or any app to save.
- Alt + PrtScn is especially useful for IT documentation, support tickets, or sharing a specific app window without revealing the rest of your desktop.
How to Auto-Save Full Screen
Window Only
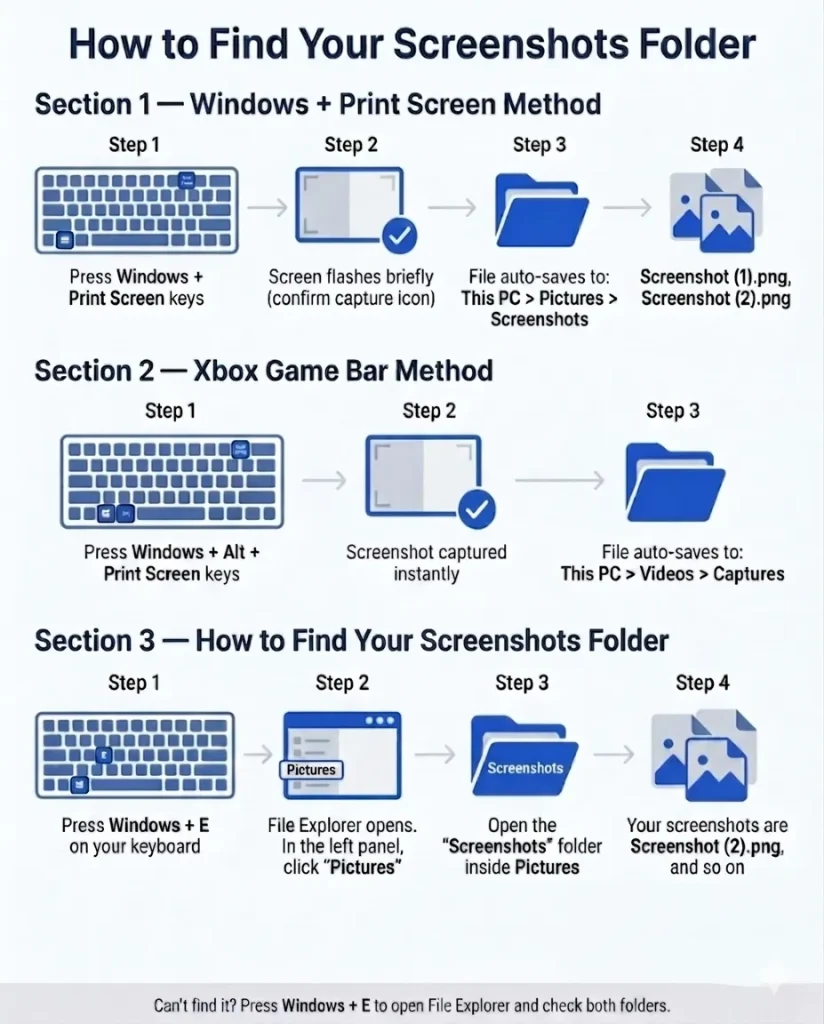
- Press Windows + PrtScn on your keyboard.
- Your screen will briefly dim to confirm the capture.
- The screenshot is automatically saved as a PNG file no pasting required.
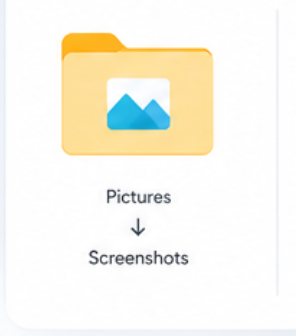
- Find it in File Explorer under Pictures > Screenshots. Files are named sequentially: Screenshot (1).png, Screenshot (2).png, and so on.
Xbox Windows Game Bar Screenshot
Window
- Press Windows + Alt + PrtScn to instantly capture your active window using Xbox Game Bar.
- You can also press Windows + G to open the full Game Bar overlay first, then click the camera icon in the Capture widget.
- The screenshot saves automatically no clipboard paste needed.
- Find it in File Explorer under Videos > Captures note: this is different from the Pictures > Screenshots folder used by other methods.
How to screen record on Windows?
Windows 10 and Windows 11 have a built-in screen recorder inside Xbox Game Bar no third-party software required.
Use the shortcut Windows + Shift + R to start recording immediately, or follow these steps:
- Press Windows + G to open the Xbox Game Bar overlay
- Press 'Windows Key' + 'Alt' + 'R' Windows + Alt + R to start screen recording instantly simantanuously. A small recording timer appears in the top-right corner of your screen.
- Toggle the microphone on or off inside the recording widget before or during capture.
-
When done, press Windows + Alt + R again to stop, or click the red Stop button in the recording widget.
The screen recording or capture folder is usually available in File Explorer. Your recording saves automatically to Videos > Captures in File Explorer as an MP4 file the same folder as Game Bar screenshots.
Xbox Game Bar can only record one app window at a time — it cannot record the full desktop, File Explorer, or some system windows. If you need to record the full desktop, use Windows + Shift +.
How to Screenshot on Windows 11 and 10 - Top Built-in Methods
The built-in tools and keyboard shortcuts make it easy to capture your screen on both Windows 10 and Windows 11. The methods below work without downloading any software everything you need is already included with Windows.
The Snipping Tool is the most reliable built-in screenshot tool for Windows users. On Windows 11, it replaces the older Snip & Sketch app and now includes a built-in editor, screen recording, OCR text extraction, and a delay timer all in one free app.
- Search for Snipping Tool in the Start menu and open it. You can also pin it to your taskbar for faster access.
- Click New or press Ctrl + N to start a new capture.
- Choose your snip mode: Rectangular snip, Freeform snip, Window snip, or Fullscreen snip.
-
After capturing, the built-in editor opens automatically annotate with pen or highlighter, crop, use the color picker, or click Text actions to extract text from the image using OCR.
- Press Ctrl + S to save, or Ctrl + C to copy to clipboard. No extra software needed.
Using Windows + Print Screen (Auto Save)
The following are the steps for window users.
- Press Windows+PrtScn to capture the entire screen
- As you take a screenshot, you will receive a notification that the screenshot has been taken
- Your screenshot is saved in Pictures > Screenshot folder to manage and access it easily.
Screenshot Windows 10
Most screenshot shortcuts work identically on Windows 10 and Windows 11. The main difference is the tool name and feature set.
- Use PrtScn to copy the full screen to clipboard — paste into Paint to save.
- Press Windows + Shift + S for a custom screen capture this opens the Snip & Sketch overlay on Windows 10 (called the Snipping Tool overlay on Windows 11 same shortcut, same function).
- Use the Snip and Sketch tool for editing Open Snip & Sketch from the Start menu for annotation, cropping, and saving. On Windows 11, this app has been replaced by the updated Snipping Tool.
- Use Windows + PrtScn to auto-save a full-screen capture to Pictures > Screenshots this works identically on both Windows versions.
How to screenshot on laptops (All Brands)
Taking a screenshot on a laptop follows the same process as a desktop PC, but compact keyboards sometimes require one extra step. If the Print Screen key doesn’t respond, hold Fn + PrtScn to activate it common on Lenovo, HP, Asus, and Dell laptops.
Here is how each shortcut maps to laptop keyboards:
- Fn + PrtScn copies full screen to clipboard (same as PrtScn on desktop)
- Fn + Windows + PrtScn auto-saves full screen to Pictures > Screenshots
- Windows + Shift + S works on every laptop without needing the PrtScn key at all the most reliable fallback
On Microsoft Surface devices and Windows tablets, press Power + Volume Up simultaneously this auto-saves directly to Pictures > Screenshots.
If none of the above work, check your laptop’s function lock (Fn Lock or F-Lock key). When Fn Lock is active, you may need to press PrtScn without holding Fn.
Where Do Screenshots Go on Windows?
One of the most searched questions about taking a screenshot on Windows is “where do my screenshots go?” The answer depends entirely on which method you used. Some methods auto-save a file, while others only copy the image to your clipboard. The most important distinction: pressing PrtScn alone never saves a file it only copies to clipboard. The only shortcut that saves automatically is Windows + Print Screen.
| Method Used | Save Location | Saved as File? |
|---|---|---|
| Print Screen (PrtScn) | Clipboard only | No, paste into Paint to save |
| Alt + Print Screen | Clipboard only | No, paste into Paint to save |
| Windows + Shift + S | Clipboard only | No, paste into Paint to save |
| Windows + Print Screen | Pictures > Screenshots | Yes, saved automatically as PNG |
| Windows + Alt + Print Screen (Game Bar) | Videos > Captures | Yes, saved automatically as PNG |
| Snipping Tool | Your chosen location | Yes, saved when you click Save |
| OneDrive + Print Screen | OneDrive > Pictures > Screenshots | Yes, saved to cloud automatically |
On Windows 10 and Windows 11, every screenshot taken with the Windows + Print Screen shortcut is saved automatically to Pictures > Screenshots. On Windows 10, this folder is accessible from File Explorer under This PC > Pictures > Screenshots. On Windows 11, the same location applies and screenshots are named sequentially as Screenshot (1).png, Screenshot (2).png, and so on.
OneDrive Screenshot Auto-Save on Windows
If OneDrive is installed on your Windows PC, you can set it to automatically save every screenshot to the cloud. Click the OneDrive icon in your system tray, go to Settings, open the Sync and Backup tab, and toggle on “Save screenshots I capture to OneDrive.” Once enabled, every screenshot you take is instantly uploaded to OneDrive > Pictures > Screenshots and accessible from any device. Keep in mind that enabling this, changes the PrtScn key behavior instead of copying to clipboard only, it will trigger an auto-save to OneDrive.
How to Change Where Screenshots Save on Windows
If you want to move the default Screenshots folder to a different drive or location:
- Open File Explorer and go to Pictures > Screenshots
- Right-click the Screenshots folder and select Properties
- Click the Location tab
- Click Move and choose your new preferred location
- Click Apply and confirm when Windows asks if you want to move existing files
From that point forward, all Windows + PrtScn screenshots will save to your new chosen location automatically.
Screenshot Windows: Where to Find Them When Nothing Works
If you have taken a screenshot and cannot find it anywhere,
try these steps in order.
- First check your clipboard by pressing Ctrl + V inside Paint or Word. If the screenshot is there, it was saved to clipboard only.
- Second, open File Explorer and search for the word "screenshot" with the scope set to "This PC." Windows will show every screenshot file saved on your computer.
- Third, check the Videos > Captures folder in case you accidentally used the Xbox Game Bar.
- Fourth, if OneDrive is installed on your PC, check your OneDrive Pictures folder online at onedrive.live.com because OneDrive may have saved it to the cloud automatically.
How to Take a Screenshot on Windows Without the Print Screen Key
Not every keyboard has a Print Screen button, and on many laptops the PrtScn key is hidden behind the Fn key combination. If your Print Screen key is missing, broken, or not responding, there are several reliable ways to take a screenshot on Windows without it.
Some users search for how to ss on Windows or how to clip on PC — both refer to the same process: capturing your screen without relying on the PrtScn key.
This is the best screenshot Windows shortcut that does not require the Print Screen key at all. Press Windows + Shift + S to instantly open the Snipping Tool overlay. You can then select any area of the screen, capture a specific window, or take a full screen grab, all without touching the PrtScn key.
Go to the Start menu, search for Snipping Tool, and open it. From inside the app, click New to start a capture. You can choose from rectangular, freeform, window, or fullscreen modes. This works entirely with your mouse and no keyboard shortcut is required.
Press Windows + G to open Xbox Game Bar and click the camera icon to take a screenshot. This is another completely PrtScn-free screenshot method that works on both Windows 10 and Windows 11.
If your physical Print Screen key is broken, Windows has a built-in on-screen keyboard that includes a virtual PrtScn button.
- 1Go to Settings > Accessibility > Keyboard and enable the On-Screen Keyboard, or search for it in the Start menu
- 2The virtual keyboard will appear on screen
- 3Locate the PrtScn button on the on-screen keyboard
- 4Click it to take a screenshot just like pressing the physical key
On many laptops from brands like Lenovo, HP, Dell, and Asus, the Print Screen function is accessed by holding Fn + PrtScn together. If pressing PrtScn alone does nothing, this combination is usually the fix. Some laptops also require Fn + Windows + PrtScn to auto-save the screenshot.
Screenshot Mac vs Screenshot Windows
Both Mac and Windows allow taking screenshots, but their shortcuts and tools are different. Windows provides more flexible tools like Snipping Tool, while Mac focuses on a smoother screenshot experience.
| Feature | Windows | Mac |
|---|---|---|
| Basic Shortcut | PrtScn (Print Screen) | Command + Shift + 3 |
| Partial Screenshot | Windows + Shift + S | Command + Shift + 4 |
| Active Window | Alt + PrtScn | Command + Shift + 4 + Space |
| Auto Save | Windows + PrtScn | Saves automatically by default |
| Built-in Tool | Snipping Tool / Snip & Sketch | Screenshot Toolbar |
| Flexibility | More built-in options and editing tools | Simple and clean interface |
While screenshot Mac relies on a consistent set of Command-key combos, screenshot Windows offers more flexible built-in tools and editing options through Snipping Tool and Snip & Sketch.
What is the best screenshot software for Windows?
There are many software programs available for computers. You can use your preferred software to take a screenshot using a PC.
Snagit
Paid/ Premium

This is a premium screenshot tool designed for professional users who need advanced tools, including captures, scrolling, comprehensive image editing, and text extraction (OCR).
LightShot
Free

Another best, free tool is LightShot screenshot software, known for quick, simple screenshots. It enables fast selection and sharing with basic annotation options.
Snipaste
Free

Snipaste is a free, unique screenshot Windows app, allowing pin images to the top of the screen for easy comparison or reference. It’s not only a free tool, but also a lightweight app.
(Free/ Open Source

This is a powerful tool used to capture the screen, record, and instant share to various devices.
PicPick
Free/ Paid

Another useful screenshot tool is PicPick, with a user-friendly ribbon interface, advanced color pickers, advanced annotation, and pixel rulers.
How to Edit and Share a Screenshot on Windows?
Once captured, most screenshots can be edited directly:
- Snip & Sketch / Snipping Tool: Crop, highlight, and add text before saving
- Paint: Paste your clipboard screenshot for basic editing and resizing
- Right-click any saved screenshot and select Share to send it directly via email, Teams, or other apps
How to Crop a Screenshot?
After capturing, open the image in Snipping Tool or Paint, use the crop tool to trim unwanted areas, then save.
How to Take a Scrolling Screenshot on Windows
The built-in Snipping Tool and Print Screen only capture what is currently visible on your screen. If you need to screenshot a full webpage, a long document, or an entire chat conversation on Windows, you need a different method.
The easiest way is through Microsoft Edge. Press Ctrl + Shift + S inside Edge and select Capture full page. Edge will automatically scroll through the entire page and save it as one complete image without needing any extra software or extension.
For Google Chrome users, press Ctrl + Shift + I to open Developer Tools, then press Ctrl + Shift + P, type screenshot in the search box, and select Capture full size screenshot. Chrome saves the full page directly to your Downloads folder as a PNG file.
If you need to capture a scrolling screenshot of any window on Windows, not just a browser, ShareX is the best free tool available. It supports scrolling capture for documents, applications, and web pages and stitches everything into one long image automatically.
Windows 11 Screenshot Updates in 2026 2026 Update
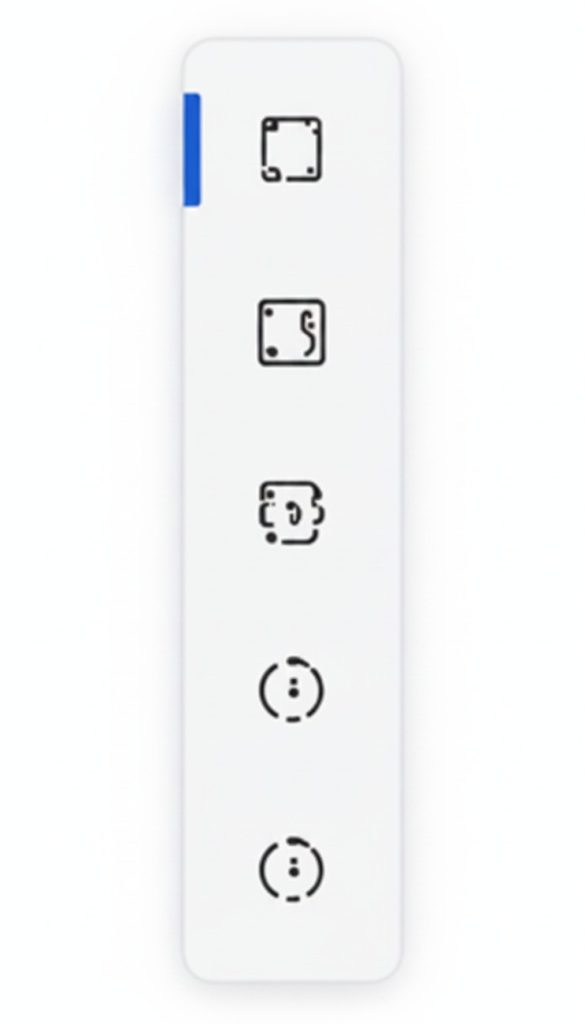
Microsoft continues to add new features to the Snipping Tool in Windows 11, making it one of the most powerful built-in screenshot tools available on any operating system. If you are using a Copilot+ PC, which is a newer Windows 11 device with a built-in AI processor, the Snipping Tool unlocks three exclusive AI-powered features that are not available on standard Windows 11 machines.
Copilot+ PC Only
Copilot+ PC Only
Copilot+ PC Only
Common Screenshot PC Problems and Fixes
Sometimes screenshots don’t work properly. Here are solutions to some common issues:
Screenshot: Computer not saving
Problem
Screenshots are not saving automatically.
Solutions
- Check the screenshot folder from My Pc and the Picture section
- Ensure that your PC’s storage is not full
- Try using Windows+PrtScn again
- Restart your PC or File Explorer
- If the issue persists your system may not have permission to save files in the default folder
Screenshot Windows shortcut not working
Problem
Shortcut keys are not responding
Solutions
- Restart your computer and try again
- Check if the Fn key is required (Fn+PrtScn)
- Check that no other software is overriding the shortcut
- Update your keyword drivers
- Tip: Try Fn + PrtScn on laptops
Screenshot on PC is not working
Problem
Screenshots are not working at all
Solutions
- Update your PC
- Check keyboard functionality
- Use alternative methods like Snipping Tool
- Close background apps and try again
Windows + Shift + S not working?
Problem
Snipping shortcut is not opening
Solutions
- Restart your system
- Check if the Snip and Sketch tool is enabled
- Reset the Snipping tool from settings
- Install the pending Windows updates
Advanced Screenshot Windows Tips
Small movements can make a big difference. If you want better screenshots, try these tips:
- Capture only a selected part of the screen to keep it focused
- Take high-resolution screenshots for better results
- Capture full screen or specific windows based on your need
- Save screenshots in an organized folder for easy access and for later use
- Use the crop tool to remove unnecessary areas and clean up the image
- Use editing tools to highlight important information
- Use Fn+Windows Key+Space bar on some laptops
Which Screenshot Method Should You Use?
| Task | Best Method |
|---|---|
| Capture the entire screen | Windows + PrtScn |
| Copy the entire screen | PrtScn |
| Capture one window | Alt + PrtScn |
| Capture part of the screen | Windows + Shift + S |
| Take a game screenshot | Windows + Alt + PrtScn |
| Record the screen | Windows + Alt + R |
What are the Screenshot File Formats
Windows saves screenshots in different formats depending on the tool you use.
| Format | Best Use |
| PNG | Best image quality |
| JPG | Smaller file size |
| BMP | Uncompressed image |
| GIF | Basic graphics |
PNG is the default format for most Windows screenshots because it preserves image quality.
How to Recover Screenshots from the Clipboard?
When you press PrtScn, Alt + PrtScn, or Windows + Shift + S, Windows copies the screenshot to the clipboard instead of saving it immediately. If you accidentally copy something else afterward, the screenshot may be replaced.
To avoid losing screenshots, enable Clipboard History:
- Press Windows + V.
- Turn on Clipboard History if it’s disabled.
- Press Windows + V anytime to view recently copied screenshots and text.
This feature is useful when you work with multiple screenshots without saving each one immediately.
How to Screenshots on Multiple Monitors?
Windows handles screenshots differently when multiple displays are connected.
- PrtScn captures all monitors.
- Windows + PrtScn saves all monitors as one image.
- Alt + PrtScn captures only the active window.
- Windows + Shift + S lets you capture a specific monitor or selected area.
Screenshot vs Screen Recording
Screenshot | Screen Recording |
Captures a single image | Captures video |
Saved as PNG | Saved as MP4 |
Best for documents | Best for tutorials |
Use a screenshot for static content and a screen recording when you need to show actions or movement.
How to Improve Screenshot Quality?
For clearer screenshots:
- Save images as PNG.
- Capture at your screen’s native resolution.
- Crop unnecessary areas.
- Add annotations only when needed.
Conclusion
Screenshot Windows is a simple process if you know the right method. You can use shortcut keys, built-in tools, and advanced options to take quality screenshots. Windows offers multiple ways to capture your screen. If you also use a smartphone, check our guides on taking screenshots on Android and capturing screenshots on iPhone. If you work across operating systems, you may also find our Linux screenshot guide helpful. Try different methods and use the one that fits you best.
FAQs
How do I take a screenshot on a PC?
To take a screenshot on Windows, press Windows + Shift + S to open the Snipping Tool and capture any area of your
screen. For a full-screen screenshot that saves automatically, press Windows + Print Screen, your image saves to Pictures > Screenshots instantly. You can also press PrtScn alone to copy the screen to clipboard, then paste it into Paint or any editor to save it.
Why is Win+Shift+S not working?
If the Win+Shift+S shortcut is not opening the Snipping Tool, it may be due to disabled notifications, a software conflict, or a hung Snipping Tool process. To fix it, restart your computer, make sure Snipping Tool notifications are enabled in Settings, check that no other app is overriding the shortcut, and install any pending Windows updates.
What is the most common Windows Screenshot shortcut key?
Windows+Shift+S is the most common shortcut to take a screenshot. Most of the PCs and laptops are compatible with this.
Why do we use the Screenshot Windows key?
We use the Windows Key to capture the entire screen using the shortcut keys, such as (Win+PrtSc). It instantly captures the screen that you want as an image file without needing external apps. The screenshot saves to the screenshot folder automatically.
How to Take a Screenshot in Windows 7?
For Windows 7 users, press PrtScn to copy the full screen to clipboard, then open Paint, press Ctrl + V to paste, and save the file using File > Save As. The Snipping Tool is also available in Windows 7 Home Premium, Professional, and Ultimate editions at Start > All Programs > Accessories. For a complete Windows 7 screenshot guide, visit our dedicated page.
How to Screenshot on Windows Surface and Tablet Devices?
If you are using a Microsoft Surface or any Windows tablet without a physical keyboard, the standard screenshot shortcuts will not work. Instead, press the Power button and Volume Down button at the same time and hold both for about one second until the screen flashes. Your screenshot saves automatically to Pictures > Screenshots, just like the Windows + PrtScn method. This works on Surface Pro, Surface Go, Surface Laptop in tablet mode, and any other Windows 10 or Windows 11 tablet device.
How do I take a partial screenshot on Windows?
Open the Snipping Tool from the Start menu and select Rectangular Snip to click and drag over the exact area you want to capture. For an irregular shape, choose Freeform Snip and draw around the area freely. You can also press Windows + Shift + S to instantly open the snipping overlay and select any part of your screen without opening the full app.
How do I crop a screenshot on Windows?
After taking a screenshot with the Snipping Tool, the image opens automatically in the editor. Click the crop icon in the toolbar, drag the handles to select the area you want to keep, and click Save. If you used PrtScn and pasted into Paint, go to Image and select Crop to trim the image before saving.
Can I take a full-page or scrolling screenshot on Windows?
Yes — while the built-in tools only capture a single screen, third-party apps like Snagit or ShareX offer scrolling capture modes for full webpages or long documents.
How to screenshot on pc?
You can take a screenshot on computers by pressing Windows + Shift + S for a custom snip, or PrtScn for a full-screen capture that copies to the clipboard.
Why is Ctrl+Shift+S not working?
Ctrl+Shift+S is not the default screenshot shortcut on Windows — the correct combo is Windows + Shift + S. If that’s not working, check that Snip and Sketch is enabled in Settings.
Where are screenshots saved on Windows 11?
The save location on Windows 11 depends on which method you used. Screenshots taken with Windows + Print Screen save automatically to Pictures > Screenshots as a PNG file. Screenshots taken with Windows + Shift + S or PrtScn alone are copied to your clipboard only — they are not saved as files unless you paste them into an app and save manually. Xbox Game Bar screenshots save to Videos > Captures. Press Win + V to check Clipboard History if you cannot find a recent screenshot.
Why does pressing Print Screen not save a file?
Pressing PrtScn alone copies your entire screen to the clipboard — it does not create or save a file. To save a screenshot automatically, use Windows + Print Screen instead, which saves directly to Pictures > Screenshots as a PNG file. If you used PrtScn, open Paint and press Ctrl + V to paste and then save. On Windows 11 version 23H2 and later, pressing PrtScn may now open the Snipping Tool overlay rather than copying to clipboard, depending on your settings.
What is the difference between Snipping Tool and Snip & Sketch?
Snip & Sketch was the screenshot app introduced in Windows 10 as a replacement for the original Snipping Tool. On Windows 11, Microsoft merged both into a single updated app simply called Snipping Tool. The modern Snipping Tool includes all features of both older apps plus new additions: screen recording, OCR text extraction, a color picker, and an improved editor. If you are on Windows 10 and see “Snip & Sketch,” it functions identically to pressing Win + Shift + S.
How do I screenshot a dropdown menu or tooltip?
Use the delay timer in the Snipping Tool. Open the full Snipping Tool app from the Start menu, click the delay dropdown, and set it to 3–10 seconds. Click New, then quickly open your dropdown menu or hover over the tooltip during the countdown. The Snipping Tool will capture automatically when the timer ends. This is the most reliable way to screenshot any interface element that disappears when you click.
How do I fix Snipping Tool not working on Windows 11?
If the Snipping Tool is not opening or crashing, try these steps in order: restart your computer; check that the Win + Shift + S shortcut is enabled under Settings > Accessibility > Keyboard; repair the app via Settings > Apps > Snipping Tool > Advanced options > Repair; if repair fails, click Reset in the same menu; and finally reinstall the app from the Microsoft Store. If the shortcut works but screenshots appear black, switch to Xbox Game Bar as a workaround.
Is the Snipping Tool free on Windows 11?
Yes, the Snipping Tool is a free built-in app included with every copy of Windows 10 and Windows 11. You do not need to purchase or install anything. If it is missing from your PC, you can download it for free from the Microsoft Store by searching for “Snipping Tool.” All core features — rectangular snip, freeform snip, window snip, screen recording, and OCR — are available at no cost.