Screenshot Mac | How to Screenshot on MacBook Air, Pro & iMac
We can use different methods to capture the Mac screen. The fastest way to screenshot on Mac is to press Command + Shift + 3, which instantly captures your full screen and saves it to the desktop as a PNG file. macOS also gives you Command + Shift + 4 to capture any selected area and Command + Shift + 5 to open the full Screenshot toolbar with advanced options including timed capture and screen recording. Whether you are using a MacBook Air, MacBook Pro, iMac, or Mac Mini, every Screenshot Mac method works the same way across all models, including M1, M2, M3, and M4 chip machines.
What Are the Screenshot Mac Shortcut Keys?
macOS gives you five main keyboard shortcuts for taking screenshots. Each one captures a different part of the screen and all of them save the image directly to your Desktop as a PNG file by default.
| Shortcut | What It Does |
|---|---|
| Command + Shift + 3 | Captures the entire screen instantly |
| Command + Shift + 4 | Lets you drag to select a specific area |
| Command + Shift + 4 + Spacebar | Captures a specific window or menu |
| Command + Shift + 5 | Opens the Screenshot toolbar (all options) |
| Command + Shift + 6 | Captures the Touch Bar (older MacBook Pro only) |
How to Screenshot on Mac — Built-in Methods
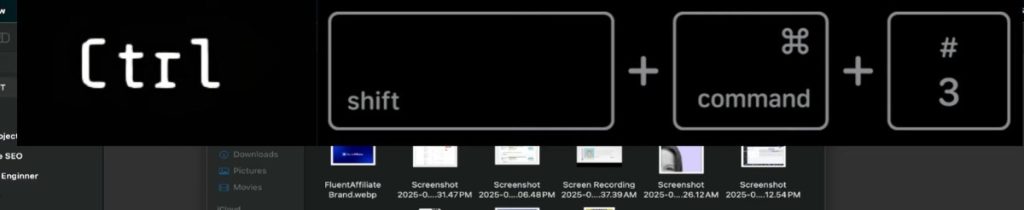
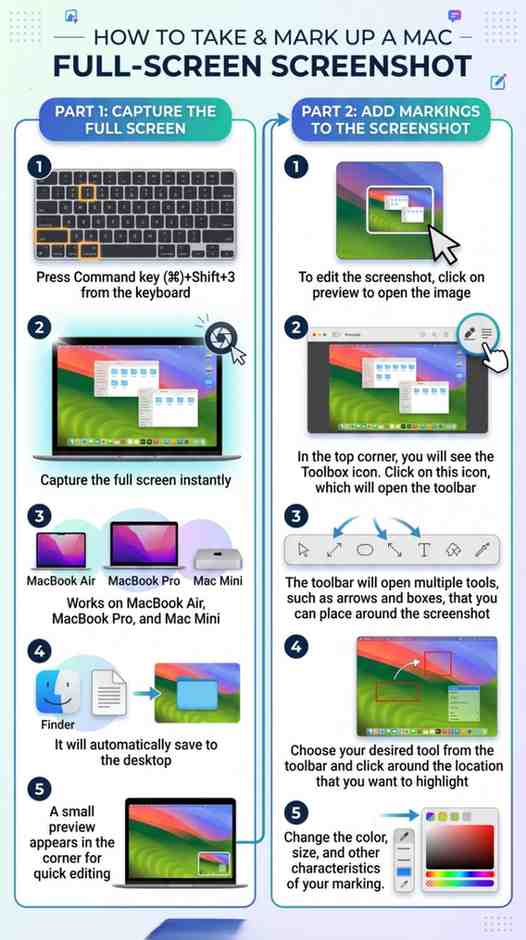
1. Command + Shift + 3 — Full Screen Capture
You can easily take a full-screen Mac screenshot. It is simple, which requires a few simple steps:
- Press Command key (⌘) + Shift + 3 to capture everything visible on your screen in one press.
- The screenshot saves automatically to your Desktop with the filename "Screen Shot [date] at [time].png".
- A small thumbnail appears in the bottom right corner of your screen.
- Click it to open Markup and edit the screenshot immediately, or leave it to disappear and save on its own.
Add Markings to the Screenshot
- To edit the screenshot, click on preview to open the image
- In the top corner, you will see the Toolbox icon. Click on this icon, which will open the toolbar
- The toolbar will open multiple tools, such as arrows and boxes, that you can place around the screenshot
- Choose your desired tool from the toolbar and click around the location that you want to highlight
- It allows you to change the color, size, and other characteristics of your marking.
This method is considered the fastest Mac Screenshot Shortcut for full display.
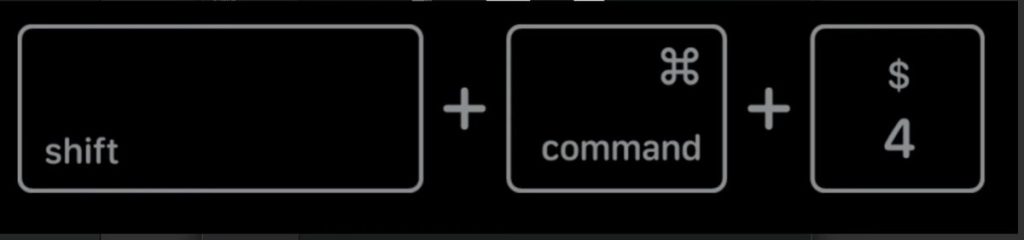
2. Command + Shift + 4 : Select a Specific Area
- Press Command + Shift + 4 and your cursor changes to a crosshair.
- Click and drag to select the exact area of the screen you want to capture.
- When you release the mouse button, the selected area saves as a PNG file to your Desktop.
- This is the most versatile screenshot Mac shortcut because it lets you capture precisely what you need without including anything else.
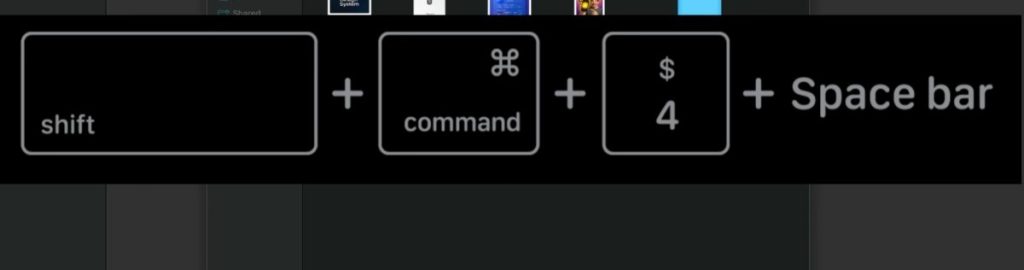
3. Command + Shift + 4 + Spacebar : Capture a Window
- Press Command + Shift + 4, then immediately press the Spacebar.
- Your cursor changes to a camera icon. Move it over any open window and the window highlights in blue.
- Click to capture just that window. The screenshot includes the window's drop shadow by default, which gives it a clean, polished look.
- To capture the window without the shadow, hold Option while clicking.
4. Command + Shift + 5 : Screenshot Toolbar (All Options)
- Press Command + Shift + 5 to open the Screenshot toolbar at the bottom of your screen.
- This toolbar was introduced in macOS Mojave and gives you access to every capture mode in one place. From here you can capture the full screen, a selected window, or a custom area.
- You can also record your entire screen or a selected portion as a video.
- The Options button lets you change the save location, set a timer before capture, and toggle the floating thumbnail on or off.
5. Command + Shift + 6 : Touch Bar Capture
- If you are using an older MacBook Pro that has a Touch Bar, press Command + Shift + 6 to capture the contents of the Touch Bar.
- This creates a wide, thin image showing whatever is currently displayed there.
- This shortcut only applies to MacBook Pro models with a Touch Bar (2016 to 2021).
- Newer MacBook Pro models do not have a Touch Bar.
How to Edit and Crop a Screenshot on Mac
- After taking any screenshot on Mac, a small thumbnail appears in the bottom right corner of your screen.
- Click it immediately to open the screenshot in the Markup toolbar.
- If you do not click it, the thumbnail disappears after a few seconds and the file saves automatically to your Desktop.
- Inside Markup you can crop the image, add text, arrows, and shapes, highlight areas with color, insert your signature, and change colors and font sizes.
- Click Done to save the edited version.
- If you missed the thumbnail, find the screenshot on your Desktop, right-click it, and choose Open With > Preview.
- In Preview go to Tools > Show Markup Toolbar to access the same editing tools.
How to Use the Mac Screenshot Toolbar (Command + Shift + 5)
The Screenshot toolbar is the most powerful built-in screenshot tool on Mac. Press Command + Shift + 5 to open it. A floating panel appears at the bottom of your screen with five capture options:
Capture Entire Screen (same as Command + Shift + 3) — captures your full display instantly
Capture Selected Window (same as Command + Shift + 4 + Spacebar) — click any window to capture it
Capture Selected Portion (same as Command + Shift + 4) — drag to select a custom area
Record Entire Screen — records your full display as video
- Record Selected Portion — records a chosen area as video

How to Take a Timed Screenshot on Mac
To capture a dropdown menu, tooltip, or any screen element that disappears when you press a key, use the timer in the Screenshot toolbar. Press Command + Shift + 5 to open the toolbar, click Options, and select Timer, 5 seconds or 10 seconds. Click the capture button to start the countdown. During that time, open the dropdown menu or hover over the element you want to capture. The Screenshot toolbar will take the screenshot automatically when the timer runs out.
- This feature is available on macOS Mojave and later on all Mac models including MacBook Air, MacBook Pro, iMac, and Mac Mini.
How to Save a Mac Screenshot to Clipboard (Not the Desktop)
By default, every Mac screenshot saves as a file on your Desktop. If you want to copy a screenshot directly to your clipboard instead of saving a file, add the Control key to any shortcut.
After pressing any of these shortcuts, paste the screenshot immediately using Command + V into any app including Messages, Mail, Slack, Word, or Pages. No file is created and nothing saves to your Desktop. This is especially useful when you want to share a screenshot quickly without creating files.
Where Do Screenshots Save on Mac?
By default, every screenshot taken with a Mac keyboard shortcut saves to your Desktop as a PNG file. The filename follows this format:
| Method | Save Location | Saved as File? |
|---|---|---|
| Command + Shift + 3 | Desktop | Yes, PNG |
| Command + Shift + 4 | Desktop | Yes, PNG |
| Command + Shift + 4 + Spacebar | Desktop | Yes, PNG |
| Command + Shift + 5 | Your chosen folder | Yes, PNG |
| Control + Any shortcut | Clipboard only | No file created |
How to Change the Screenshot Save Location on Mac
If you want screenshots to save somewhere other than your Desktop, press Command + Shift + 5 to open the Screenshot toolbar. Click Options and under "Save to" choose from Desktop, Documents, Clipboard, or Other Location to browse and select any folder on your Mac. This setting applies to all future screenshots until you change it again.
How to Save Screenshots to a Custom Folder Using Terminal
Open Terminal from Applications > Utilities > Terminal. Type each command below and press Return after each one.
How to Change Screenshot Format from PNG to JPG
By default Mac saves screenshots as PNG files. To switch to JPG for smaller file sizes, open Terminal and run these two commands:
You can also use these valid format options:
How to Take a Scrolling Screenshot on Mac
Apple does not include a built-in scrolling screenshot feature in macOS. The standard shortcuts only capture what is currently visible on your screen. To capture a full webpage or long document on Mac, you need to use one of the following methods.
- 1Open the webpage in Safari
- 2Go to File in the menu bar and choose Export as PDF
- 3Choose a save location and click Save
- 4The exported PDF contains the entire webpage from top to bottom, including all content below the visible area.
- 5Open the PDF in Preview to convert it to PNG or JPEG if needed
- 1Press Command + Option + I to open Developer Tools
- 2Press Command + Shift + P to open the Command Menu
- 3Type screenshot in the search box and select Capture full size screenshot
- 4Chrome captures the entire scrollable page and saves it to your Downloads folder as a PNG file.
- 1Open the webpage in Firefox
- 2Right-click anywhere on the page and select Take Screenshot
- 3Click Save full page to capture the entire scrollable page as PNG image
Best Screenshot Apps for Mac in 2026
Mac's built-in screenshot tools cover most everyday needs. If you need more advanced features like scrolling capture, cloud sharing, or professional annotations, these are the best free and paid options available in 2026.
Do Mac Screenshot Shortcuts Work on M1, M2, M3, and M4 Macs?
Yes. Every Mac screenshot shortcut works identically on all Mac models regardless of chip. Whether you are using a MacBook Air with M1, M2, M3, or M4, a MacBook Pro with Apple Silicon, an iMac, or an older Intel-based Mac, the shortcuts Command + Shift + 3, Command + Shift + 4, and Command + Shift + 5 all work exactly the same way
- One thing to note about Retina displays: because Mac Retina screens have twice the pixel density of standard displays, screenshots taken on a Retina Mac are saved at double the resolution. For example, a screenshot on a 1440 x 900 MacBook Air display produces a 2880 x 1800 pixel image file. This means Mac screenshots are naturally high-resolution even without any special settings.
How to Screenshot on Mac Using a Windows Keyboard
If you are connecting a Windows keyboard to a Mac Mini, MacBook, or iMac, the key mapping is as follows
Windows Key = Command key
Alt Key = Option key
Print Screen = No direct equivalent on Mac
- To take a full screen screenshot using a Windows keyboard on Mac, press the Windows Key + Shift + 3.
- For a selected area, press Windows Key + Shift + 4.
- To open the Screenshot toolbar, press Windows Key + Shift + 5.
The Windows key functions exactly the same as the Command key for all Mac screenshot shortcuts.
Common Screenshot Mac Problems and Fixes
Here are some common issues users may face when taking Macbook Screen.
Screenshot Mac not working
Issue:
The screenshot Mac keyboard shortcut is not responding, try these fixes in order.
Solutions
- First restart your Mac and test again.
- Second check that the shortcuts have not been changed by going to System Settings > Keyboard > Keyboard Shortcuts > Screenshots
- Making sure the shortcuts are enabled and set to their defaults.
- Third quit any app that might be intercepting the shortcuts such as clipboard managers or screen recording apps.
- Fourth update macOS from System Settings > General > Software Update, as bugs in older versions can break screenshot shortcuts.
Screenshot Mac Not Saving to Desktop
Problem
Screenshot MacBook is not saving to the desktop.
Solutions
- First, open the screenshot tool (Command Key+ Shift+ 5)
- Click on options
- Under “Save to”, select Desktop. It will reset the default screenshot location on Mac.
- Check clipboard mode. If this option is selected, the image won’t be saved as a file.
- Switch back to the desktop and see it in other options, including Documents, Custom Folder, Downloads, etc.
- Restart your Mac and try again
Mac Screenshots Are Black or Blank
Issue:
Screenshot appears completely black or blank after capture.
Solutions
- Some apps block screenshots for copyright protection including Netflix, Apple TV Plus, and Amazon Prime Video
- If your screenshot appears black it means the app has DRM protection enabled
- This is intentional behavior and cannot be bypassed within the app
- Close the streaming app and try taking your screenshot outside of the protected app
- If the issue happens in other apps too, restart your Mac and try again
Screenshot Mac Shortcut Not Responding After macOS Update
Problem
Screenshot shortcuts stopped working after a macOS update.
Solutions
- Open System Settings > Privacy and Security > Screen Recording
- Check whether any recently updated app has lost its Screen Recording permission
- Re-enable permissions for any app that needs it
- Also try resetting your NVRAM by restarting your Mac and holding Option + Command + P + R for 20 seconds
- If shortcuts still do not work go to System Settings > Keyboard > Keyboard Shortcuts > Screenshots and restore defaults
Extra Tips for Better Screenshots
For the quality screenshots on Mac, follow the given steps:
- For instant editing, click the Preview tool, click on the thumbnail in the corner to crop, annotate, or highlight without opening another app.
- Organize the file in a custom folder to keep your screenshots on Mac neat and easy to find.
- For quick sharing, save it to the clipboard
- For advanced editing, like scrolling screenshots, long pages, or extra editing features, try third-party apps.
Conclusion
There are multiple ways to take a screenshot Mac to save time and work efficiently without installing anything. If you also use Windows, Android, or iPhone, explore our screenshot guides for those devices. Whether you use Command + Shift + 3 for a quick full-screen capture, Command + Shift + 4 to select a specific area, or Command + Shift + 5 to access all options in one place, every method works identically on all Mac models including M1, M2, M3, and M4. Try the method that fits your workflow and you will find taking screenshots on Mac simple and fast.
FAQs
How do I take a screenshot on a Mac?
Press Command + Shift + 3 to capture the full screen. Press Command + Shift + 4 to select a custom area. Press Command + Shift + 5 to open the Screenshot toolbar with all capture options. All screenshots save to your Desktop by default as PNG files.
What is the screenshot Mac hotkey?
The most common Mac screenshot hotkey is Command + Shift + 3 for a full screen capture. Command + Shift + 4 is used for selecting a specific area. Command + Shift + 5 opens the Screenshot toolbar. These shortcuts work on all Mac models including MacBook Air, MacBook Pro, iMac, and Mac Mini.
Does Mac have a Snipping Tool like Windows?
Mac does not have an app called Snipping Tool. However, macOS has built-in screenshot tools that work the same way. Press Command + Shift + 4 to select and capture any area, or press Command + Shift + 5 to open the Screenshot toolbar which gives you all capture modes in one interface.
How to take a screenshot on a Mac without a mouse?
Take screenshot on a MacBook without using a Mac is simple. Press and hold Command+Shift+5 and then click on the spacebar. Now, the cursor will change to the camera, and you can move it around the screen. Copy the specific app windows, press and hold Command+Shift+4, and then click on the spacebar.
How do I take a partial screenshot on Mac?
Press Command + Shift + 4 and your cursor changes to a crosshair. Click and drag over the area you want to capture and release the mouse. Only the selected portion will be saved as a screenshot.
How do I crop a screenshot on Mac?
After taking a screenshot, click the thumbnail that appears in the bottom right corner to open Markup. Click the Crop icon, drag the handles to select the area you want to keep, and click Done. If the thumbnail has already disappeared, find the screenshot on your Desktop and open it with Preview, then use Tools > Show Markup Toolbar to access the crop tool
Where does the Mac screenshot save?
By default, Mac screenshots save to your Desktop with the name “Screen Shot [date] at [time].png”. To change the save location, press Command + Shift + 5, click Options, and select a new location.
How do I take a screenshot on MacBook Air?
The screenshot shortcuts on MacBook Air are identical to all other Macs. Press Command + Shift + 3 for a full screen capture, Command + Shift + 4 to select an area, or Command + Shift + 5 to open the Screenshot toolbar. These work on all MacBook Air models including M1, M2, M3, and M4.
How do I copy a Mac screenshot to clipboard instead of saving it?
Add the Control key to any shortcut. Press Control + Command + Shift + 3 to copy the full screen, or Control + Command + Shift + 4 to copy a selected area. You can then paste it immediately with Command + V into any app.
Do Mac screenshot shortcuts work on M1, M2, M3, and M4 Macs?
Yes. All Mac screenshot shortcuts work identically on Apple Silicon and Intel Mac models. MacBook Air, MacBook Pro, iMac, and Mac Mini all use the same shortcuts regardless of which chip they contain.